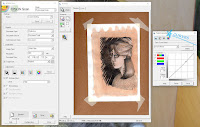
Scanning Images for a Portfolio
Recently I was asked how I scan original artwork for my web
portfolio. This is a complex question to answer but I thought I would try it.
Of course, there are many different scanners and kinds of software available to
scan and edit your work. I used an Epson
Workforce scanner with its software and Photoshop CS5.
When beginning the scanning process I try and remember to
clean the scanner bed. I use a spray glass cleaner (spray the cloth, not the
scanner bed) and a soft brush. Next, I place the image face down on the bed
with the image closest to the arrow on the side of the bed and I close the scanner
lid. Going to my computer, I open the scanner software. In the software window,
I check my settings. I have the document type set at reflective, the image type
at 24-bit color, and the resolution set at 300dpi.
*A little about resolution: 300dpi is required for print
images and 72dpi is the minimum for the web. I scan at the higher resolution
and reduce the size later.
In the scanning software window, I select the preview
button. I then select the area of the image I want to scan using the selection
tool (it usually looks like a “+”). At
this point, the image may need adjusting, (remember the final image is only as
good as the original scan) I use the adjustment tools available with the
scanner software. In this case, I used curves, levels and unsharpen mask.
Levels adjusts tonal range and color balance (great for contrast), Curves
adjusts tone and unsharpen mask sharpens the image without creating pixilation.
The adjustments I choose are specific to each image and can be reverted to the
original at any time. When I am pleased with the image I scan then save it as a
jpeg to the image folder and name the image. At this point, I could rescan the
image at a low resolution and save it to use for a web portfolio. For someone unfamiliar
with editing software this could work, but for the best possible image quality,
I continue editing my image in Photoshop.
After the image is scanned and saved, I open it in
Photoshop. First, I unlock the image by double clicking the layer in the layers
panel. I duplicate the image layer to adjust it without changing the original. For
my image, I wanted the background a little richer to match the original more
closely. Again, I adjust the tone, brightness/contrast, and levels in the
adjustments tab of Photoshop. I changed the canvas size (image>canvas size),
next I enlarge the image using the transform tool (edit tab>free transform).
This image seems to need a more even border and I can handle this two ways. I
could cut and paste more of the sepia border on the other side of the torso but
I chose to use the clone stamp tool to continue the edge. The clone tool is
useful for areas of color that need smoothing or cleaning up the odd speck of
dust but you need to use it carefully and sparingly.
When the image looks good, I save the Photoshop file at the
same 300dpi resolution. Then I save the image as a jpeg file at a resolution of
300dpi and then at 150dpi (image>image size). I save the jpegs and rename the smaller file
as low resolution. This way I can easily locate it later. Now I have three
files that I can use in the future for the web or print projects.


